Home soundproofing DIY is the fastest growing trend for people tired of outside noise, thin apartment walls, or wanting to improve their work-from-home setup. Whether you want to block traffic noise, noisy neighbors, or reduce echo for gaming and content creation, doing it yourself can save money and solve daily problems right away.
Key Takeaways
- The global DIY home soundproofing market is booming due to remote work and home content creation trends.
- Most DIY soundproofing methods help reduce airborne noise but struggle with bass and impact noise between floors.
- Renters should check lease terms before installing permanent soundproofing solutions that alter apartment walls or floors.
- What Is Home Soundproofing DIY and Why Try It?
- Step-by-Step Guide: DIY Soundproofing That Works
- Advanced Analysis & Common Pitfalls
- Conclusion
- FAQ
What Is Home Soundproofing DIY and Why Try It?
Home soundproofing DIY is the process of reducing unwanted noise at home with simple, affordable upgrades instead of hiring a professional contractor. People turn to it for instant relief from noisy neighbors, street traffic, echoey rooms during calls, or to create a private content creation space. The surge of remote work and at-home podcasting in 2024 has accelerated this movement, with the global acoustic panel market valued at USD 12.8 billion this year alone.
People choose DIY soundproofing because:
- It’s cheaper and faster than professional solutions.
- Modern DIY products are attractive, easy to install, and reversible for renters.
- Demand is rising from those frustrated by urban noise pollution, especially in apartments or shared homes.
Soundproofing isn’t just about silence—properly done, it boosts comfort, focus, privacy, and even sleep quality.
Step-by-Step Guide: DIY Soundproofing That Works
DIY soundproofing means combining different materials and techniques depending on your room, noise source, and goals. Below is a practical stepwise system for most homes—especially for renters or those on a budget.
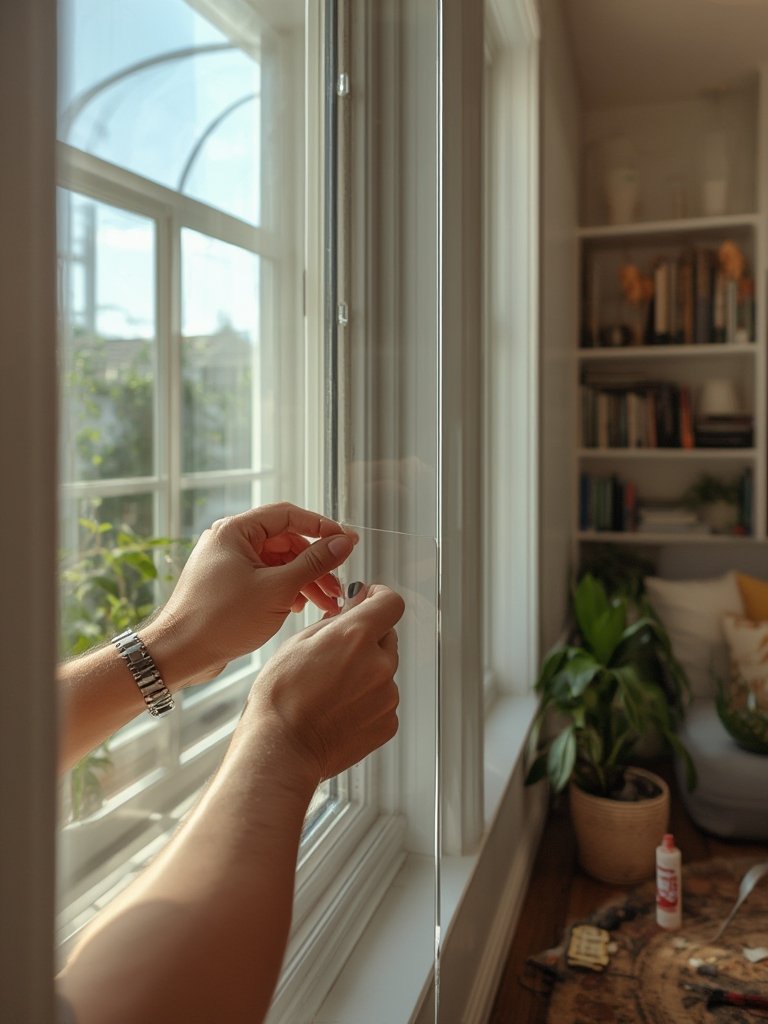
- Seal Doors and Windows
Use weatherstripping, draft-stopping door sweeps, and acoustic caulks to block cracks. Even small gaps can let a surprising amount of noise through. Install foam gaskets around door frames and cheap stick-on window film on single-pane windows. - Easy Wall Upgrades with Panels and Foam
stick-on acoustic foam panels or felt tiles absorb echo and some mid-high frequency sounds. Interlocking fluted acoustic panels add a decorative touch and are easily removed. For renters, look for panels with magnetic or reusable adhesive mounts. - Add Soft Furnishings
Rugs, thick curtains, and wall tapestries help soak up sound. Modern washable rugs protect your floors and soften footsteps, which is especially useful for apartments. - Block Floor/Ceiling Noise (If Possible)
Place dense mats, layered rugs, or even foam exercise tiles to dampen sounds between floors. Underlayment—like recycled rubber or Mass loaded vinyl (MLV) underlay—goes under carpet for bigger results, but may not be renter-friendly. - Strategic Furniture Placement
Fill echoey corners and shared walls with bookshelves, dressers, or even dressers. See our dresser organizer guide for maximizing furniture function in tight spaces. - Fix and Block Electrical Outlets
Insulate wall outlets and switch boxes on shared walls using putty pads. They’re cheap and make a real difference. - Check for Major Air Gaps
Patch up or caulk any visible cracks in walls, floors, or around HVAC vents that let noise slip in.
Important: Most DIY solutions are better for reducing echo and airborne noise (talking, TV, etc.) than for blocking bass or footstep vibrations from upper or lower floors. Blocking structure-borne sound requires dense materials and may need professional installation or landlord approval.
For advanced, rental-friendly solutions, removable Command hooks or strips are a renter’s friend for mounting lightweight panels or curtains without wall damage. Peel and stick flooring tiles (peel and stick floor tiles) can further help minimize impact noise without permanent changes.
Advanced Analysis & Common Pitfalls
While home soundproofing DIY fixes many issues, it also has limits and potential frustrations.
- Effectiveness Is Variable: Most common DIY panels help mostly with echoes—rarely do they fully block loud outside noise or strong bass.
- Costs vs. Results: Professional soundproofing can cost thousands, but even DIY upgrades add up. Materials like foam panels or mass loaded vinyl start at $30–$80 for a room—compared to pro jobs that may be $1,000+.
- Longevity: Stick-on or temporary solutions can wear out or fall over time in humid spaces. Check adhesive longevity, especially for panels and underlayment.
- Renters’ Restrictions: Many landlords prohibit significant wall or floor alterations—always ask before installing anything that leaves marks or holes. Building codes often require certain soundproofing levels in new builds but don’t cover upgrades after move-in. Refer to market insights from Future Market Insights for more on changing regulations.
| DIY Solution | Estimated Cost (per room) | Lifespan | Noise Type Addressed | Permanence |
|---|---|---|---|---|
| Acoustic panels/foam tiles | $30–$200 | 2–5 years | Echo/reverb Some airborne sound | Removable |
| Mass loaded vinyl (MLV) underlay | $80–$250 | 10+ years | Airborne sound Partial impact noise | Semi-permanent |
| Weatherstripping/door sweeps | $10–$40 | 3–5 years | Door/window gaps | Removable |
| Thick rugs, curtains | $35–$150 | 5+ years | Floor/room echo Some impact noise | Removable |
| Professional installation | $1,000+ | 10–20 years | All types (superior results) | Permanent |
There are also technical and time limitations:
- Surface prep (like cleaning walls) is critical for any adhesive panels.
- MLV, underlay, or floor upgrades may take a weekend or more to install—some solutions are simply too heavy for renters.
- Home office soundproofing is easier than treating an entire apartment.
For multi-family units, be aware that landlords may need to approve structural changes (especially to shared walls and floors). In most of Europe, strict building codes enforce acoustic performance, pushing renters towards only removable upgrades. Full professional jobs generally outperform any DIY solution but come at a much higher price point. For a more durable, professional-grade result, review rental-friendly options side-by-side before investing heavily.

Conclusion
If you want a quieter home, home soundproofing DIY is the fastest way to address unwanted noise without breaking your budget. Start with reversible door seals, acoustic panels, and smart use of furniture—then level up to specialty materials like MLV or fluted panels only if you need more. Remember to check for rental restrictions before changing anything permanent. For more ideas on maximizing home comfort and storage, explore our guides on hidden pantry storage and vertical garden walls. Ready to transform your home environment? Start your DIY soundproofing project now and enjoy the peace you deserve.
FAQ
Is DIY soundproofing as effective as professional installation?
No—DIY methods are best for echo reduction and lowering moderate airborne noise, but may not block major street or neighbor sounds. For severe issues, professional work is often required.
What is the cheapest way to soundproof my apartment walls?
Use adhesive foam panels, fluted wall panels, and pack shared walls with bookshelves or wardrobes. Seal all door and window gaps with weatherstripping. Thick curtains also help soften noise.
Are there any renter-friendly soundproofing solutions?
Yes, choose removable products like stick-on acoustic tiles, Command strips for hanging curtains/panels, thick rugs, and door sweeps. Avoid products that require nails or permanent adhesives unless your landlord allows it.
How long does a typical DIY soundproofing fix last?
Weatherstripping or door sweeps last 3–5 years, foam panels around 2–5 years, and heavy curtains or rugs over 5. Mass loaded vinyl or underlayment can last 10+ years, but this depends on installation and wear.
What’s the main limitation of DIY soundproofing?
Blocking impact noise (like footsteps from above) and deep bass is very difficult with lightweight or removable materials. Heavy, dense installations give stronger results but are less renter-friendly.